
Passwordless Authentication với AWS Cognito: Xác thực Không Cần Mật Khẩu Chuyên mục Devops 2025-03-19 34 Lượt xem 34 Lượt thích 0 Bình luận
1. Giới thiệu
Trong thế giới số ngày nay, bảo mật tài khoản người dùng là yếu tố quan trọng hàng đầu. Tuy nhiên, việc ghi nhớ mật khẩu có thể gây phiền toái và không an toàn. Passwordless Authentication (Xác thực không cần mật khẩu) giúp giải quyết vấn đề này bằng cách sử dụng email hoặc các dịch vụ đăng nhập bên thứ ba như Google, Facebook, Apple thay vì mật khẩu truyền thống.
AWS Cognito là một giải pháp mạnh mẽ giúp triển khai Passwordless Authentication dễ dàng, an toàn và có khả năng mở rộng. Trong bài viết này, chúng ta sẽ tìm hiểu cách sử dụng AWS Cognito để xác thực người dùng chỉ bằng email hoặc tài khoản mạng xã hội.
Passwordless Authentication (Xác thực không cần mật khẩu) giúp người dùng đăng nhập chỉ bằng email hoặc số điện thoại mà không cần nhập mật khẩu. AWS Cognito hỗ trợ xác thực passwordless bằng cách sử dụng Custom Authentication Challenge, trong đó một chuỗi xác thực sẽ được gửi đến người dùng qua email/SMS.
Trong bài viết này, chúng ta sẽ triển khai Passwordless Authentication với AWS Cognito bằng cách sử dụng Define Auth Challenge, Create Auth Challenge, Verify Auth Challenge Response và Pre Sign-up Lambda Function.
2. Tại sao nên dùng Passwordless Authentication?
🔹 Bảo mật tốt hơn
- Loại bỏ rủi ro bị tấn công brute-force hoặc rò rỉ mật khẩu.
- Không cần lưu trữ mật khẩu trên server.
🔹 Trải nghiệm người dùng tốt hơn
- Không cần ghi nhớ mật khẩu.
- Đăng nhập nhanh hơn chỉ bằng email hoặc tài khoản mạng xã hội.
🔹 Dễ dàng tích hợp với Single Sign-On (SSO)
- Dễ dàng đăng nhập với Google, Facebook, Apple, Microsoft.
- Tích hợp tốt với hệ sinh thái AWS.
3. Kiến trúc tổng quan
📌 Luồng hoạt động đăng nhập
-
Người dùng nhập email/số điện thoại trên ứng dụng (Flutter/Next.js).
-
Ứng dụng gọi API InitiateAuth của Cognito để bắt đầu quá trình xác thực.
-
Cognito kích hoạt Lambda Define Auth Challenge để xác định loại thử thách xác thực.
-
Cognito gọi Create Auth Challenge để tạo mã OTP và gửi qua email/SMS.
-
Người dùng nhập mã OTP và gửi lên backend.
-
Cognito gọi Verify Auth Challenge Response để kiểm tra tính hợp lệ của OTP.
-
Nếu hợp lệ, Cognito cấp ID Token, Access Token, Refresh Token cho người dùng.

📌 Luồng hoạt động với SSO
- Người dùng chọn "Đăng nhập với Google" (hoặc một dịch vụ khác như Facebook, Apple).
- Ứng dụng redirect đến Cognito.
- Cognito tự động chuyển hướng đến Google để xác thực.
- Người dùng đăng nhập vào Google và cấp quyền cho ứng dụng.
- Google trả về ID Token cho Cognito.
- Cognito tạo Authorization Code và redirect đến Backend.
- Backend đổi Authorization Code lấy Access Token từ Cognito.
- Backend tạo sessionId và redirect về ứng dụng.
- Ứng dụng gửi sessionId lên Backend để lấy Access Token.
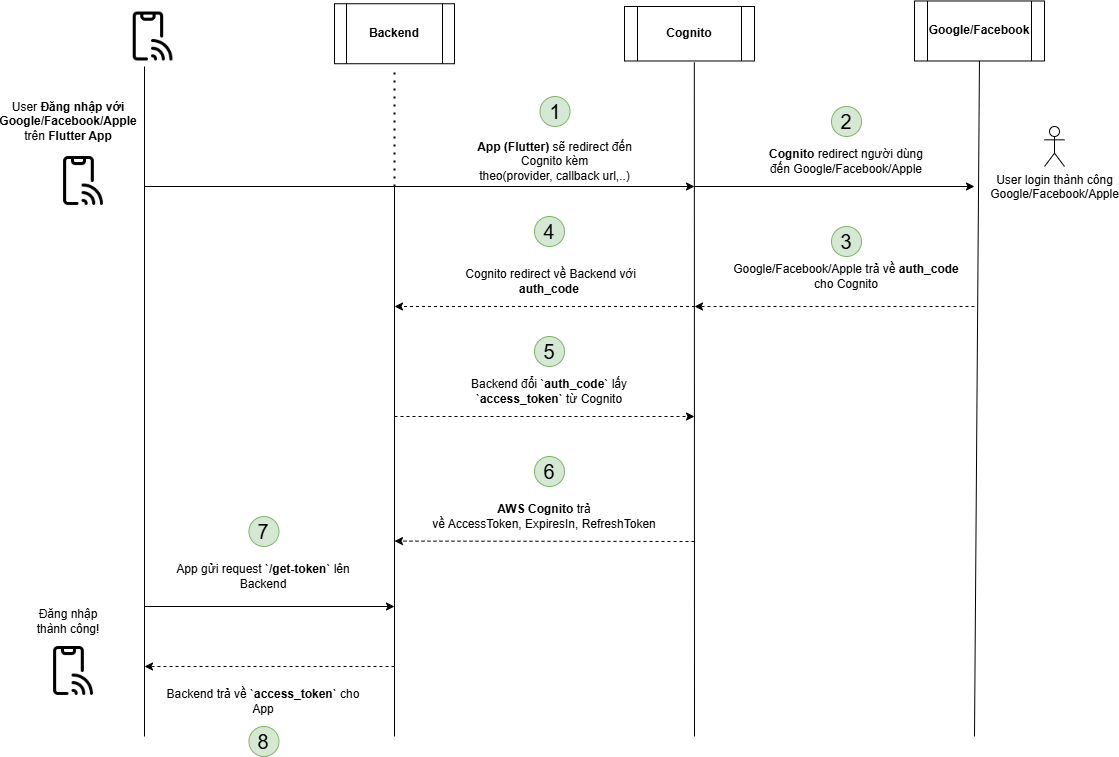
📌 Lưu ý quan trọng: Người dùng KHÔNG cần đăng nhập vào Cognito, Cognito chỉ làm nhiệm vụ trung gian.
4. Lambda function
Các bạn chọn node phiển bản 20.x và thêm các đoạn code mà mình đã chuẩn bị sau đây cho từng lambda function, để chạy được các bạn phải đặt các lambda function name được cognito cung cấp sau:
PreSignUp, CustomMessage, PostConfirmation, PreAuthentication, PostAuthentication, DefineAuthChallenge, CreateAuthChallenge, VerifyAuthChallengeResponse, PreTokenGeneration, UserMigration, PreTokenGenerationConfig, CustomSMSSender, CustomEmailSender, KMSKeyIDNote: Ko được tự định nghĩa lambda function name.
4.1. Define Auth Challenge
Lambda này sẽ xác định thử thách nào được sử dụng cho xác thực passwordless.
export async function handler(event) {
    console.log("DefineAuthChallenge event:", JSON.stringify(event, null, 2));

    const { session } = event.request;

    if (session && session.find(attempt => attempt.challengeName !== 'CUSTOM_CHALLENGE')) {
        event.response.issueTokens = false;
        event.response.failAuthentication = true;
    } else if (session && session.length >= 3 && session.slice(-1)[0].challengeResult === false) {
        event.response.issueTokens = false;
        event.response.failAuthentication = true;
    } else if (session && session.length &&
        session.slice(-1)[0].challengeName === 'CUSTOM_CHALLENGE' &&
        session.slice(-1)[0].challengeResult === true) {
        event.response.issueTokens = true;
        event.response.failAuthentication = false;
    } else {
        event.response.issueTokens = false;
        event.response.failAuthentication = false;
        event.response.challengeName = 'CUSTOM_CHALLENGE';
    }

    return event;
}
Sau khi hoàn thành tạo lambda function bạn cần phải thêm permisson cho từng lambda
aws lambda add-permission \
    --function-name VerifyAuthChallenge \
    --statement-id cognito-trigger-verify-auth-challenge \
    --action "lambda:InvokeFunction" \
    --principal cognito-idp.amazonaws.com \
    --source-arn "arn:aws:cognito-idp:ap-northeast-1:311141543481:userpool/ap-northeast-1_lll0jDlfD"

aws lambda add-permission \
    --function-name CreateAuthChallenge \
    --statement-id cognito-trigger-create-auth-challenge \
    --action "lambda:InvokeFunction" \
    --principal cognito-idp.amazonaws.com \
    --source-arn "arn:aws:cognito-idp:ap-northeast-1:311141543481:userpool/ap-northeast-1_lll0jDlfD"

aws lambda add-permission \
    --function-name DefineAuthChallenge \
    --statement-id cognito-trigger-define-auth-challenge \
    --action "lambda:InvokeFunction" \
    --principal cognito-idp.amazonaws.com \
    --source-arn "arn:aws:cognito-idp:ap-northeast-1:311141543481:userpool/ap-northeast-1_lll0jDlfD"

aws lambda add-permission \
    --function-name PreSignUp \
    --statement-id cognito-trigger-pre-signup \
    --action "lambda:InvokeFunction" \
    --principal cognito-idp.amazonaws.com \
    --source-arn "arn:aws:cognito-idp:ap-northeast-1:311141543481:userpool/ap-northeast-1_lll0jDlfD"

aws lambda add-permission \
    --function-name PostConfirmation \
    --statement-id cognito-trigger-post-confirmation \
    --action "lambda:InvokeFunction" \
    --principal cognito-idp.amazonaws.com \
    --source-arn "arn:aws:cognito-idp:ap-northeast-1:311141543481:userpool/ap-northeast-1_lll0jDlfD"
Kiểm tra xem đã thêm được permission chưa, tương tự cho các function khác
aws lambda get-policy --function-name DefineAuthChallenge4.2. Create Auth Challenge
Để function này chạy được các bạn cần phải đóng gói thư viện lên lambda các bạn làm bước sau , sau đó thì tạo ra 1 layer để dùng chung
mkdir lambda-layer && cd lambda-layer
mkdir -p nodejs && cd nodejs
npm init -y
npm install @aws-sdk/client-ses crypto-secure-random-digit
cd ..
zip -r lambda-layer.zip nodejs
Tiếp theo các bạn sang bên service SES đăng ký 1 email để phục vụ gửi mail
- Vào AWS Console → SES → Verified identities
- Chọn "Create identity" → Email address
- Nhập email test của bạn (ví dụ: test@example.com)
- Nhận email xác minh từ AWS → Nhấn vào link xác nhận
Lambda này sẽ tạo mã OTP và gửi đến người dùng bằng email mà bạn đã tạo ở trên.
import { SESClient, SendEmailCommand } from "@aws-sdk/client-ses";
import { randomDigits } from "crypto-secure-random-digit";

const sesClient = new SESClient({ region: process.env.AWS_REGION });

export async function handler(event) {
    console.log("CreateAuthChallenge event:", JSON.stringify(event, null, 2));

    if (!event.request.session || !event.request.session.length) {
        // Tạo mã xác minh ngẫu nhiên 6 chữ số
        const challengeCode = randomDigits(6).join("");

        // Lưu mã vào private challengeParameters
        event.response.publicChallengeParameters = { email: event.request.userAttributes.email };
        event.response.privateChallengeParameters = { challengeCode };
        event.response.challengeMetadata = `CODE-${challengeCode}`;

        // Gửi mã qua email
        const emailParams = {
            Destination: { ToAddresses: [event.request.userAttributes.email] },
            Message: {
                Body: {
                    Text: { Data: `Mã xác nhận của bạn là: ${challengeCode}` }
                },
                Subject: { Data: "Xác nhận đăng nhập" }
            },
            Source: process.env.SENDER_EMAIL
        };

        try {
            await sesClient.send(new SendEmailCommand(emailParams));
            console.log("Email sent successfully.");
        } catch (error) {
            console.error("Email sending failed:", error);
        }
    } else {
        // Nếu đã có session trước đó, lấy lại mã từ challenge trước
        const previousChallenge = event.request.session.slice(-1)[0];
        const challengeCode = previousChallenge.challengeMetadata.match(/CODE-(\d*)/)[1];

        // Giữ nguyên mã cũ cho lần thử lại
        event.response.publicChallengeParameters = { email: event.request.userAttributes.email };
        event.response.privateChallengeParameters = { challengeCode };
        event.response.challengeMetadata = `CODE-${challengeCode}`;

        console.log("Reusing previous challenge code.");
    }

    return event;
}
Thêm permisson
aws lambda add-permission \
    --function-name CreateAuthChallenge \
    --statement-id cognito-trigger-create-auth-challenge \
    --action "lambda:InvokeFunction" \
    --principal cognito-idp.amazonaws.com \
    --source-arn "arn:aws:cognito-idp:ap-northeast-1:311141543481:userpool/USER_POOL_ID"
Gắn thêm policy cho lambda function để có thể send mail đến user, hãy vào IAM user chọn role của lambda này và thêm statement
...
,{
    "Effect": "Allow",
    "Action": "ses:SendEmail",
    "Resource": "arn:aws:ses:ap-northeast-1:311141543481:identity/sondh3@gmail.com"
}
4.3. Verify Auth Challenge
Lambda này xác minh mã OTP do người dùng nhập.
export async function handler(event) {
  console.log("VerifyAuthChallengeResponse event:", JSON.stringify(event, null, 2));

  // Lấy mã OTP mong đợi từ privateChallengeParameters
  const expectedAnswer = event.request.privateChallengeParameters.challengeCode;

  // Kiểm tra nếu người dùng nhập đúng mã
  if (event.request.challengeAnswer === expectedAnswer) {
      console.log("User provided the correct challenge code.");
      event.response.answerCorrect = true;
  } else {
      console.log("User provided an incorrect challenge code.");
      event.response.answerCorrect = false;
  }

  return event;
}
Thêm permisson
aws lambda add-permission \
    --function-name VerifyAuthChallenge \
    --statement-id cognito-trigger-verify-auth-challenge \
    --action "lambda:InvokeFunction" \
    --principal cognito-idp.amazonaws.com \
    --source-arn "arn:aws:cognito-idp:ap-northeast-1:311141543481:userpool/USER_POOL_ID"
4.4. Pre Sign-up Lambda Function
Lambda này giúp tự động xác nhận tài khoản của người dùng.
export async function handler(event) {
  console.log("PreSignUp event:", JSON.stringify(event, null, 2));

  event.response.autoConfirmUser = true;

  console.log("User auto-confirmed and email auto-verified.");
  return event;
}
5. Thiết lập AWS Cognito
Bước 1: Tạo User Pool trên Cognito
- Truy cập AWS Cognito → Chọn Manage User Pools → Tạo một User Pool mới.
- Trong Attributes, chỉ chọn Email (Vì chúng ta không dùng mật khẩu).
- Ở Sign-in options, bật Federated Identity Providers.
Các bước trên là các bạn tạo trong aws console, bạn có thể sử dụng CLI để tạo cho nhanh
aws cognito-idp create-user-pool \
    --pool-name "PasswordlessOtpUserPool" \
    --username-configuration CaseSensitive=false \
    --policies '{
        "PasswordPolicy": {
            "MinimumLength": 16,
            "RequireUppercase": true,
            "RequireLowercase": true,
            "RequireNumbers": true,
            "RequireSymbols": true
        }
    }' \
    --schema '[
        {
            "Name": "email",
            "AttributeDataType": "String",
            "Mutable": false,
            "Required": true,
            "StringAttributeConstraints": {
                "MinLength": "8"
            }
        }
    ]'
Gắn trigger lambda function vào Cognito
aws cognito-idp update-user-pool \
    --user-pool-id "USER_POOL_ID" \
    --lambda-config '{
        "PreSignUp": "arn:aws:lambda:ap-northeast-1:311141543481:function:PreSignUp",
        "DefineAuthChallenge": "arn:aws:lambda:ap-northeast-1:311141543481:function:DefineAuthChallenge",
        "CreateAuthChallenge": "arn:aws:lambda:ap-northeast-1:311141543481:function:CreateAuthChallenge",
        "VerifyAuthChallengeResponse": "arn:aws:lambda:ap-northeast-1:311141543481:function:VerifyAuthChallenge"
    }'
Kiểm tra xem đã gắn được trigger hay chưa
aws cognito-idp describe-user-pool --user-pool-id "USER_POOL_ID" Bước 2: Cấu hình Google, Facebook, Apple Sign-in
- Trong User Pool, vào Identity Providers → Chọn Google.
- Điền Client ID và Client Secret từ Google Developer Console.
- Chọn Email trong Scope để lấy email người dùng.
Bước 3: Cấu hình App Client
- Trong Cognito, vào App Clients → Thêm một App Client mới.
- Chọn Authorization Code Grant và bật Identity Providers đã cấu hình.
Bước 4: Cấu hình Callback URL
- Vào App Integration → Domain Name, đặt domain Cognito (ví dụ: myapp.auth.ap-south-1.amazoncognito.com).
- Trong OAuth 2.0, đặt Redirect URI trỏ đến backend (ví dụ: https://your-backend.com/oauth/callback).
6. Cách triển khai trên ứng dụng Flutter & Next.js cho đăng nhập qua SSO
📌 Trên Flutter: Redirect đến Cognito
final uri = Uri.https(
  "myapp.auth.ap-south-1.amazoncognito.com",
  "/oauth2/authorize",
  {
    "client_id": "your-client-id",
    "response_type": "code",
    "redirect_uri": "https://your-backend.com/oauth/callback",
    "identity_provider": "Google"
  },
);
launchUrl(uri.toString());
📌 Backend xử lý Authorization Code
import requests

def exchange_code_for_token(auth_code):
    url = "https://myapp.auth.ap-south-1.amazoncognito.com/oauth2/token"
    data = {
        "grant_type": "authorization_code",
        "client_id": "your-client-id",
        "client_secret": "your-client-secret",
        "redirect_uri": "https://your-backend.com/oauth/callback",
        "code": auth_code
    }
    response = requests.post(url, data=data)
    return response.json()
📌 Backend tạo sessionId và redirect về App
from flask import Flask, request, redirect
app = Flask(__name__)

@app.route("/oauth/callback")
def oauth_callback():
    auth_code = request.args.get("code")
    token_data = exchange_code_for_token(auth_code)
    session_id = create_session(token_data)  # Lưu session vào DB
    return redirect(f"your-app://callback?session_id={session_id}")
📌 Flutter lấy Access Token từ Backend
Future<void> getToken(String sessionId) async {
  final response = await http.get(
    Uri.parse("https://your-backend.com/get-token"),
    headers: {"Authorization": sessionId},
  );
  final data = jsonDecode(response.body);
  print("Access Token: ${data['access_token']}");
}
7. Cách triển khai Không dùng SSO
Code trên Backend (Django)
Gửi OTP
cognito_client = boto3.client("cognito-idp", region_name="ap-south-1")
def send_otp(email):
response = cognito_client.initiate_auth(
AuthFlow="CUSTOM_AUTH",
ClientId="YOUR_COGNITO_CLIENT_ID",
AuthParameters={"USERNAME": email}
)
session = response.get("Session")
return {"session": session}Xác thực OTP
def verify_otp(email, otp, session):
    response = cognito_client.respond_to_auth_challenge(
        ClientId="YOUR_COGNITO_CLIENT_ID",
        ChallengeName="CUSTOM_CHALLENGE",
        Session=session,
        ChallengeResponses={
            "USERNAME": email,
            "ANSWER": otp
        }
    )
    return response.get("AuthenticationResult")
3️⃣ Code trên App (Flutter)
Nhập email & Gửi OTP
Future<void> sendOtp(String email) async {
  final response = await http.post(
    Uri.parse("https://your-backend.com/send-otp"),
    body: jsonEncode({"email": email}),
    headers: {"Content-Type": "application/json"},
  );
  final data = jsonDecode(response.body);
  session = data["session"];  // Lưu session để xác thực OTP
}
Xác thực OTP
Future<void> verifyOtp(String email, String otp) async {
  final response = await http.post(
    Uri.parse("https://your-backend.com/verify-otp"),
    body: jsonEncode({"email": email, "otp": otp, "session": session}),
    headers: {"Content-Type": "application/json"},
  );
  final data = jsonDecode(response.body);
  accessToken = data["access_token"]; // Lưu access token để sử dụng
}
8. Test luông Đăng nhập dùng CLI
Bước 1: tạo app client
aws cognito-idp create-user-pool-client \
    --user-pool-id "ap-northeast-1_Ohv3QKY65" \
    --client-name "LiveappDevelopAppClient" \
--generate-secretaws cognito-idp create-user-pool-client \
--user-pool-id "ap-northeast-1_Ohv3QKY65" \
--client-name "MyAppClientNoSecret" \
--no-generate-secretBước 2: Test
Test luồng đăng ký
// sign up
aws cognito-idp sign-up \
    --client-id 50sfg4g8h37v73bh88smatuhpie \
    --username sondh3@gmail.com.com \
    --password "YourTestPassword123!" \
    --user-attributes Name=email,Value=sondh3@gmail.com.com \
    --secret-hash W4Ke3wmgNEoalJPfBN2YmNcvTjHdT9yP3hSburY08Cg=
Test luồng đăng nhập
// confirm signin
aws cognito-idp initiate-auth \
    --auth-flow CUSTOM_AUTH \
    --client-id 50sfg4g8h7v73bh88smatuhpie \
    --auth-parameters '{"USERNAME": "sondh3@gmai.com", "SECRET_HASH": "W4Ke3wmgNEoalJPfBN2YmNcvTjHdT9yP3hSburY08Cg="}'
Sau khi bạn chạy CLI cho luồng signin bạn sẽ nhận được session
// confirm OTP
aws cognito-idp respond-to-auth-challenge \
    --client-id 50sfg4g8h7v73bh88smatuhpie \
    --challenge-name CUSTOM_CHALLENGE \
    --challenge-responses '{"USERNAME": "sondh3@gmail.com", "ANSWER": "912965", "SECRET_HASH": "W4Ke3wmgNEoalJPfBN2YmNcvTjHdT9yP3hSburY08Cg="}' \
    --session "AYABeCjwWeu-Kw0JqiauTCnsGCIAHQABAAdTZXJ2aWNlABBDb2duaXRvVXNlclBvb2xzAAEAB2F3cy1rbXMAUGFybjphd3M6a21zOm..."
Sau khi confirm OTP bạn sẽ nhận được accessToken, ...
Note: Để nhận được --secret-hash bạn cần phải sử dụng Backend để genarate
import hmac
import hashlib
import base64

def calculate_secret_hash(client_id, client_secret, username):
    message = username + client_id
    dig = hmac.new(
        client_secret.encode('utf-8'),
        message.encode('utf-8'),
        hashlib.sha256).digest()
    return base64.b64encode(dig).decode()

client_id = "50sfg4g8h7v73bh88smatuhpie"
client_secret = "YOUR_CLIENT_SECRET"
username = "sondh3@gmail.com"

print(calculate_secret_hash(client_id, client_secret, username))
7. Kết luận
Với AWS Cognito Passwordless Authentication, chúng ta có một phương pháp đăng nhập: ✅ Bảo mật cao 🛡️ – Không cần lưu mật khẩu. ✅ Trải nghiệm mượt mà 📲 – Chỉ cần email hoặc tài khoản Google. ✅ Dễ dàng mở rộng 🚀 – Hỗ trợ nhiều phương thức đăng nhập khác nhau.
Hãy thử triển khai ngay và mang đến trải nghiệm tốt nhất cho người dùng! 🚀


Bình luận (0)